


How To Install A Tubular Mortice Latch: A Guide
Here at Yester Home we stock a wide selection of mortice latches in a variety of styles and finishes. Please refer to the following for thorough installation instructions, but keep in mind that some carpentry and joinery knowledge would be helpful but not absolutely necessary.
These step-by-step instructions are intended only as a guide, and the steps can be changed depending on what you are fitting. We have fitted a 2.5" Heavy Duty Tubular Mortice Latch to a solid oak door and used a Lever Latch Handle for the purposes of this guide, but the same principles apply to all latches, deadbolts, and a variety of door locks with some variations in steps depending on the product.
STEPS

- Marking the location of your latch is the first step. This might vary based on what height is comfortable and is determined by how high you want your door handle or knob to be.
- On the edge of the door, place a cross at the necessary height and in the exact centre.

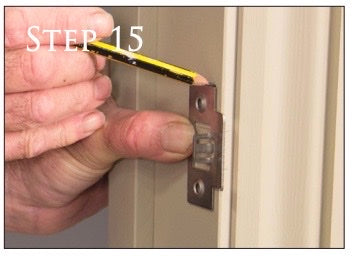
- With the square face plate secured to the edge of the door, in the middle of your pencil mark, and in the latch position.
- With a pencil, trace around the square faceplate being careful to keep everything in the middle and away from the edges.

- Drill into the door edge with an auger drill bit while using the pencil cross that you should have placed in the centre of the latch faceplate's outline.
- Make sure the bit is large enough so that the latch can easily slide into the door because the bit size is dependent on the size of the latch case.
- Since all pencil lines will be erased when you start chiselling, it is worthwhile to accomplish this drilling now.

- The latch faceplate might be extremely close to the edge of your door, thus it might be worth reinforcing it with some scrap wood and a G clamp depending on the thickness of your door.
- Start by carefully chiselling all the way around the faceplate's pencil marks.

- After drawing the outline, gently remove just enough of the door edge to allow the latch and faceplate to rest flat on the surface.

- You might want to re-drill the pre-drilled hole using the same auger bit to ensure that the latch casing will fit correctly and that the depth is correct.

- The next step is to position the spindle, which joins the two handles together and passes through the door latch.
- Start by positioning the latch so that it lines up with the drilled hole, etc., along the face of your door.
- Make a mark through the latch's spindle hole with a pencil.

- It's time to drill all the way through the door using the mark you just made in the latch's spindle hole. As a result, the spindle can move from one handle to the other, activate the latch, and connect the handle on the opposite side of the door.
- Drill a hole large enough for a 7/8mm spindle to fit through using an auger bit.

- The latch should now be inserted into the edge of the door, together with its faceplate, to ensure a flush fit.
- Hopefully, if each step is followed, everything will fit well at this point.

- Drill pilot holes while the faceplate is in place, then secure the latch with the included screws.

- It is now time to hang your doors with butt hinges and, if you choose, instal your handle or knob set (for instructions on these operations, check our other fitting guidelines).
- The receiver or keep should now be inserted into the door frame. Close the door all the way to the frame to start, then note with a pencil where the latch makes contact.

- To determine the latch's final resting position, continue making markings around the door frame after designating the latch's top and bottom.

- A helpful tip in this situation is to indicate the location of the door's edge on the reverse of the receiver plate while holding the receiver plate up to the latch's faceplate.

- Hold the receiver plate on the door frame after step 13 so that the door line on the rear of the receiver and the latch lines on the wood are centred.
- This provides a perfect location to fit the plate.
- Holding the plate securely in place, trace with a pencil the perimeter of the receiver, the two mounting holes, and the latch-fitting hole.

- The black plastic latch should be held up neatly to the frame and placed in the centre of your just-drawn outline.
- After you have chiselled and drilled through the wood, use this to clean up the appearance of the door frame.

- Before starting any chisel work after making all necessary marks, it is usually a good idea to drill any holes that are required. Otherwise, all marks will be erased.
- Drill pilot holes for the two fasteners and the frame that the latch will actually sit in so that a guide can be used to drill it out.

- Using your guide hole in the centre drill out using an auger bit enough space for the black plastic latch tidy to fit comfortably into.

- In order for the receiver plate to lie flush with the surface of your frame, carefully chisel out the main square region of the frame until it is deep enough for the tidy to fit within.

- After situating it to achieve a tight fit, neatly place the receiver on top of the lock.

- By using the provided fastening screws, secure the tidy and the receiver plate in place using the previously created pilot hole.

- The time has come to evaluate whether all the steps taken and your hard work have been worthwhile. Once the handles or knob set is installed, it's time to test the latch.
- Close the door, and if everything goes as planned, it should close effortlessly, fit snugly into the door frame, and open with equal ease.
This guide is about mortice latch fittings, but the same principles and steps can be used to fit various sizes and types of latches, as well as many different types of locks. It is always best to seek professional advice before attempting something like this, and for more complicated or multi-point locks, always refer to the manufacturer's instructions.
Shop Doorknobs in a variety of designs and materials to compliment your interior decor